Thursday, 30 July 2015

Difference between == and .equals()

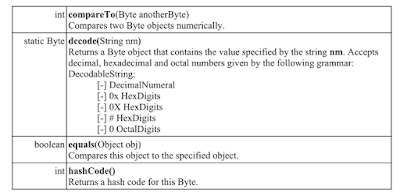
They both differ very much in their significance. equals() method is present in the java.lang.Object class and it is expected to check for the equivalence of the state of objects! That means, the contents of the objects.

Whereas the '==' operator is expected to check the actual object instances are same or not.

For example, lets say, you have two String objects and they are being pointed by two different reference variables s1 and s2.


 s1 = new String("abc");
 s2 = new String("abc");

Now, if you use the "equals()" method to check for their equivalence as


 if(s1.equals(s2))
      System.out.println("s1.equals(s2) is TRUE");
 else
      System.out.println("s1.equals(s2) is FALSE");
You will get the output as TRUE as the 'equals()' method check for the content equivality.

Lets check the '==' operator.


if(s1==s2)
     System.out.printlln("s1==s2 is TRUE");
   else
     System.out.println("s1==s2 is FALSE");

Now you will get the FALSE as output because both s1 and s2 are pointing to two different objects even though both of them share the same string content.

It is because of 'new String()' everytime a new object is created.

Try running the program without 'new String' and just with


   String s1 = "abc";
   String s2 = "abc";

You will get TRUE for both the tests.

Monday, 13 July 2015

Java Creating a Thread

In the most general sense, you create a thread by instantiating an object of type Thread. Java identifies two ways in which this can be accomplished:

(i) You can implement the Runnable interface.

(ii) You can extend the Thread class, itself.

1. Implementing Runnable


The easiest way to create a thread is to create a class that implements the Runnable interface. To implement Runnable, a class need only implement a single method called run():

public void run()

Inside the run() method, you will define the code that constitutes the new thread. The run() can call other methods, use other classes and declare variables, just like the main thread.

The only difference is that run() establishes the entry point for another, concurrent thread of execution within your program. This thread will end when run() returns.

After you create a class that implements Runnable, you will instantiate an object of type Thread from within that class using one of the following constructors:

Thread(Runnable threadObj)

Thread(Runnable threadObj, String threadName)

Here threadObj is the object whose run method is called and threadName is the name of the new thread.

After the new thread is created, it will not start running until you call start() method. The start() method puts the thread in the ready queue (runnable state). Whenever the thread gets scheduled its execution will start from the run() method.

Example:

class X implements Runnable
      public void run()
     { 
          for(int i=1; i<=5; i++)
          { 
               System.out.println("Child Thread: " + I);
          }

          System.out.println("Exiting child thread");

      }

}

class RunnableTest
     public static void main(String args[])
     { 
         X runnable  = new X();

         Thread ct = new Thread(runnable);

          ct.start();

          System.out.println("main thread exiting");

      }

}

Output:

main thread exiting

Child Thread: 1

Child Thread: 2

Child Thread: 3

Child Thread: 4

Child Thread: 5

Exiting child thread

Example:

class NewThread implements Runnable
     Thread t;

      NewThread()
     { 
         t = new Thread(this, "Demo Thread");

         System.out.println("Child thread: " + t);

         t.start();

     }

     public void run()
     { 
           for(int i=5; i>0; i--)
           {
                 try
                 { 
                       System.out.println("Child Thread: " + I);
                 }
                 catch(InterruptedException e)
                { 
                     System.out.println(e);
                }
      }

      System.out.println("Exiting child thread”);

      Thread.sleep(500);

    }

}

class ThreadDemo
     public static void main(String args[])
    { 
          new NewThread();
          try
          { 
               for(int n=5; n>0; n--)
               {
                   System.out.println("Main Thread: " + n);
                   Thread.sleep(1000);
               }
           }
           catch(InterruptedException e)
           {
                System.out.println("main thread interrupted");
            }
           System.out.println("main thread exiting");
     }
}

Output:

Child thread: Thread[Demo Thread,5,main]

Main Thread: 5

Child Thread: 5

Child Thread: 4

Main Thread: 4

Child Thread: 3

Child Thread: 2

Main Thread: 3

Child Thread: 1

Exiting child thread

Main Thread: 2

Main Thread: 1

main thread exiting

2. Extending Thread class

The second way to create a thread is to create a new class that extends Thread and then create an instance of that class. The extending class must override the run() method, which is the entry point for the new thread. It must also call start() to begin the execution of the new thread.

Example:

public class NewThread extends Thread
     NewThread()
     { 
            super("Demo Thread");
            System.out.println("Child thread: " + this);
            start();
      }

      public void run()
      { 
          for(int i=5; i>0; i--)
          { 
              try
              {
                  System.out.println("Child Thread: " + I);
                  sleep(500);
              }
              catch(InterruptedException e)
              {

              }

          }
          System.out.println("Exiting child thread");
          System.out.println(e);
     }
}

class ExtendThread
        public static void main(String args[])
        { 
            new NewThread();
            try
            { 
                for(int n=5; n>0; n--)
                {
                     System.out.println("Main Thread: " + n);
                     Thread.sleep(1000);
                }
             }
            catch(InterruptedException e)
            {
                 System.out.println("main thread interrupted");
            }
            System.out.println("main thread exiting");
       }
}

Output:

Child thread: Thread[Demo Thread,5,main]

Main Thread: 5

Child Thread: 5

Child Thread: 4

Main Thread: 4

Child Thread: 3

Child Thread: 2

Main Thread: 3

Child Thread: 1

Exiting child thread

Main Thread: 2

Main Thread: 1

main thread exiting

Note: If the thread is not assigned any name, it will be something like Thread-1, Thread-2, Thread-3 etc.

3. Choosing an Approach

The thread class defines several methods that can be overridden by a derived class. Out of these methods, the only one that must be overridden is run().

That is, of course, the same method required when you implement the Runnable interface. Many Java programmers feel that classes should be extended only when they are being enhanced or modified in some way.

So, if you will not be overriding any of Thread’s other methods, it is probably best simply to implement a Runnable interface.

Java The main thread

When a Java program starts up, one thread begins running immediately. This is usually called the main thread of your program because it is the one that is executed when your programs begins.

The main thread is the thread from which other “child” threads are created.

Although the main thread is created automatically when your program is started, it can be controlled through a Thread object. To do so, you must obtain a reference to it by calling the method currentThread(), which is public static member of Thread class. This method returns a reference to the thread in which it is called.

Once you have a reference to the main method, you can control it just like any other thread.

Example: The following example demonstrates how we can acquire reference of main thread and then access its properties using methods of Thread class.

class CurrentThreadDemo
     public static void main(String args[])
     { 
           Thread t = Thread.currentThread();
           System.out.println("Current thread: " + t);

           System.out.println("Name: " + t.getName());
           System.out.println("Priority: " + t.getPriority());

            t.setName("My Thread");

            t.setPriority(10);

            System.out.println("After name and priority change : " + t);

             System.out.println("New Name: " + t.getName());

             System.out.println("New Priority: " + t.getPriority());

             try
             { 
                    for(int n=5; n>0; n--)
                    { 
                         System.out.println(n);
                    }
             }
             catch(InterruptedException e)
             { 
                  System.out.println("main thread interrupted");
             }

             Thread.sleep(1000);
     }

}

Output:

Current thread: Thread[main,5,main]

Name: main

Priority: 5

After name and priority change : Thread[My Thread,10,main]

New Name: My Thread

New Priority: 10

5

4

3

2

1

The sleep() method in Thread might throw an InterruptedException, which is a checked exception. This would happen if some other thread wanted to interrupt this sleeping one.

Notice the output produced when t (thread reference) is used as an argument to println(). This displays in order: the name of the thread, its priority, and the name of its group. Its priority is 5, which is the default value, and main is also the name of the group of thread to which this thread belongs.

A thread group is a data structure that controls the state of a collection of threads as a whole.

Java The Thread class and the Runnable interface

Java’s multi-threading system is built upon the Thread class, its methods, and its companion interface, Runnable. This class belongs to package java.lang and hence there is no need of explicitly importing it.

Thread encapsulates a thread of execution, since you cannot directly refer to the internal state of a running thread, you will deal with it through its proxy, the Thread instance that spawned it. To create a new thread your program will either extend Thread class or implement the Runnable interface.

The Thread class defines several methods that help manage threads:


Java Messaging

When programming with most other languages, you must depend on the O.S. to establish communication between threads. This, of course, adds overhead.

By contrast, Java provides a clean, low-cost way for two or more threads to talk to each other, via calls to predefined methods that all objects have.

Java’s messaging system allows a thread to enter a synchronized method on an object, and then wait there until some other thread explicitly notifies it to come out of wait state.

Java Synchronization

Because multi-threading introduces an asynchronous behaviour to your programs, there must be a way for you to enforce synchronization when you need it.

For example, if you want two threads to communicate and share a complicated data structure, such as a linked list, you need some way to ensure that they do not conflict with each other.

That is, you must prevent one thread from writing data while another thread is in the middle of reading it. Java uses monitor for inter-thread synchronization.

You can think of a monitor as a very small box that can hold only one thread.

Once a thread enters a monitor, all other threads must wait until that thread exits the monitor. In this way, a monitor can be used to protect a shared asset from being manipulated by more than one thread at a time.

Most multi-threaded systems expose monitors as objects that your program must explicitly acquired and lock. Java provides a cleaner solution.

There is no class "monitor", instead, each object has its own implicit monitor that is automatically entered when one of the object's synchronized method is called.

Once a thread is inside a synchronized method no other thread can call any other synchronized method on the same object. This enables you to write very clear and concise multi-threaded code, because synchronization support is built into the language.

Java Thread Priorities

Java assigns to each thread a priority that determines how that thread should be treated with respect to the others.

Thread priorities are integers that specify the relative priority of one thread to another. As an absolute value, a priority is meaningless; a higher-priority thread does not run any faster than a lower-priority thread if it is the only thread running. Instead, a thread’s priority is used to decide when to switch from one running thread to next. This is called a ontext switch.

The rules that determine when a context switch takes place are simple:

  • A thread can voluntarily (on its own) relinquish control. This is done by explicitly yielding, sleeping or blocking on pending I/O. In this scenario, all other threads are examined, and normally the highest-priority thread that is ready to run is given the CPU.

  • A thread can be pre-empted by a higher-priority thread. In this case, a lower priority thread that does not yield the processor is simply pre-empted no matter what it is doing, by a higher priority thread. Basically, as soon as a higher-priority thread wants to run, it does. This is called preemptive multitasking. Some OS support non-preemptive priority based scheduling. In such case a high priority thread gets chance only when low priority thread completes.
  • In cases where two threads with the same priority are competing for CPU cycles, the situation is a bit complicated. For OS such as windows 98, threads of equal priority are normally time-sliced automatically in the round-robin fashion. For other types of OS's, thread of equal priority must voluntarily (on their own) yield (give) control to their peers. If they do not, the other threads will not run.

Note: Problems can arise from the differences in the way that O.S.’s context-switch threads of equal priority.

Java Thread Life Cycle (Thread States)

Thread exists in several states. A thread can be running. It can be ready to run as soon as it gets CPU time. A running thread can be suspended, which temporarily suspends its activity. A suspended thread can then be resumed, allowing it to pick up where it left off. A thread can be blocked when waiting for a resource. At any time, a thread can be terminated, which halts its execution immediately. Once terminated a thread cannot be resumed.

1. Newborn State

When we create a thread object, the thread is born and is said to be in newborn state. The thread is not yet scheduled for running. At this state, we can do only one of the following things with it:

1. Schedule it for running using the start() method.

2. Kill it using stop() method

If scheduled, it moves to runnable state. If we attempt to use any other method at this stage, an exception will be thrown.

2. Runnable State

The runnable state means that the thread is ready for execution and is waiting for the availability of the processor. That is, the thread has joined the queue of threads that are waiting for execution. If all threads are of equal priority, then normally they are given time slots for execution in round robin fashion. The thread that relinquishes control joins the queue at the end and again waits for its run. However, if we want a thread to relinquish control to another thread of equal priority before its turn comes, it can do so by invoking the yield() method.

3. Running State

Running means that the processor has given its time to the thread for its execution. The thread runs until it relinquishes control on its own or it is pre-empted by a higher priority thread.

A running thread may relinquish its control in one of the following situations:

  • Its time-slice is over
  • It is pre-empted by a higher priority thread
  • It yields i.e. voluntarily gives up control.
  • It has completed its execution
  • It is stopped by some other thread.
  • It has been suspended using suspend() method; a suspended thread can be revived by using the resume() method. This approach is useful when we want to suspend a thread for some time due to certain reason, but do not want to kill it.
  • It has been made to sleep. We can put a thread to sleep for a specified time period using the static method sleep(time) of Thread class where time is in milli-seconds. This means that the thread is out of the queue during the time period. The thread re-enters the runnable state as soon as this time period is elapsed.
  • It has been told to wait until some event occurs. This is done using the wait() method. The thread can be scheduled to run again using the notify() method.
  • It is performing some I/O operation.

4. Blocked State

A thread is said to be blocked when it is prevented from entering into the runnable state and subsequently the running state. This happens when the thread is suspended, sleeping or waiting in order to satisfy certain requirements. A blocked thread is considered “not runnable” but not dead and therefore fully qualified to run again.

5. Dead State

Every thread has a life cycle. A running thread ends its life when it has completed executing its run() method. It has a natural death. However, we can kill it by sending the stop message to it at any state thus causing a premature death. A thread can be killed as soon as it is born, or while it is running, or even when it is in “not runnable” (blocked condition).

Wednesday, 8 July 2015

Java Multi-Threaded Programming

1. Introduction

A thread is a single flow of control within a program. Thread is very much similar to a process. In fact, the thread is also called a lightweight process.

1.1 Thread v/s Process

Normally different processes occupy different memory space. When the CPU shifts from one process to another process, the state of the currently running process is saved and the state of another process is restored. No useful work is being done during state switch. This is referred to as context switch. The context switch time should be as less as possible to maximize the CPU utilization.

Threads are also like independent processes but they share the same memory and state. The separate threads also have separate state but the state is very small as compared to process state.

The state may contain just program counter and stack pointer. So switching from one thread to another thread takes very little time. Thus the context switch time for threads is very small as compared to the process. Hence CPU utilization is high in case of multiple threads as compared to the utilization in case of multiple processes. Threads are also referred to as light-weight process.

1.2 Multi-Threaded program

A multi-threaded program contains two or more parts that can run concurrently. Each part of such a program is called a thread, and each thread defines a separate path of execution. Thus, multi-threading is a specialized form of multi-tasking.

For example, a program may have three threads:

  • One handling the printing
  • One handling the editing
  • One downloading a file from the Internet.

All these threads might be running concurrently thus maximizing the CPU utilization.

1.3 Process-based Multi-tasking


Most of the operating systems allow you to run two or more programs at the same time. It is referred to as process-bases multi-tasking. For example, you can run a Java program and at the same time you may be editing a word document. The process-based multi-tasking ensures that there will be some program to be executed most of the time so it increases the CPU utilization.  

In process-based multi-tasking, a program is the smallest unit of code that can be dispatched by the scheduler.

1.4 Thread-based multi-tasking

Thread is the smallest unit of execution in a thread-based multi-tasking environment. A process can be divided into a number of threads executing concurrently. This allows us to handle more than one task concurrently in a single program. For example, you can edit a word document and at the same time print a portion of it or another document.

Thread-based multi-tasking improves CPU utilization just like process-based multi-tasking. But at the same time it effectively speeds up the execution of a single program by executing its different parts concurrently in separate threads.

Thus process based multi-tasking deals with the “big picture”, and thread-based multi-tasking handles the details.

1.5 The Java Thread Model

The Java run-time system depends on threads for many things, and all the class libraries are designed with multi-threading in mind. In fact, Java uses threads to enable the entire environment to be asynchronous. This helps reduce inefficiency by preventing the waste of CPU cycles.

Single threaded systems use an approach called an event loop with polling. In this model, a single thread of control runs in an infinite loop, polling a single event queue to decide what to do next. In a single threaded environment, when a thread blocks (that is, suspends execution) because it is waiting for some resource, the entire program stops running.

The benefit of Java's multi-threading is that the main loop/polling mechanism is eliminated.

When a thread blocks in Java program, only the single thread that is blocked pauses, all other threads continue to run.

Tuesday, 23 June 2015

Java Wrapper Classes

1. Introduction

The primitive data types in Java are not objects as already discussed. If we want to use these data types as objects, then we will have to use wrapper classes for each of these primitive data types provided in java.lang package.

There are many built-in classes, which cannot handle primitive data types as they deal only with objects.  One such class is Vector, which is used to store a collection of objects. We cannot use

the Vector class to directly store the collection of elements of a primitive data type. But we can do so by storing the objects of wrapper classes, which correspond to the primitive data types.

Java has a wrapper class corresponding to each of the primitive data types as shown in the following table:


2. Number class

The abstract class Number defines a super-class that is implemented by the classes that wrap the numeric types byte, short, int, long, float, and double. The number class has abstract methods that return the value of the object in each of the different number formats. These methods are:


The values returned by byteValue(), shortValue(), intValue(), longValue(), floatValue() and doubleValue() methods may involve rounding or truncation.

Example: The following example demonstrates how rounding and truncation take place when invoking methods of class Number.

class Wrapper

{ public static void main(String args[])

{ Integer iObj = new Integer(257);

System.out.println(iObj.byteValue());//truncation

Long lObj = new Long(123456789123456789L);

System.out.println(lObj);

System.out.println(lObj.doubleValue());

Float fObj=new Float(3.99f);

System.out.println(fObj.intValue());//truncation

}

}

Output:

1

123456789123456789

1.23456789123456784E17

3

3. Converting Primitive Numbers to Objects using Constructors of Wrapper

Classes and Converting Numeric Objects Back to Primitive Numbers

Example: The following example demonstrates how primitives can be wrapped in objects and how they can be converted back to primitives.

class Convert

{ public static void main(String args[])

{ System.out.println("Converting primitive numbers to objects "+

"using constructor");

byte b=105;

Byte bObj=new Byte(b);

System.out.println(bObj);

short s=2015;

Short sObj=new Short(s);

System.out.println(sObj);

int i=32717;

Integer iObj=new Integer(i);

System.out.println(iObj);

long l=234543335565675L;

Long lObj=new Long(l);

System.out.println(lObj);

float f=3.1415f;

Float fObj=new Float(f);

System.out.println(fObj);

double d=3.1415;

Double dObj=new Double(d);

System.out.println(dObj);

System.out.println("Converting numeric objects to primitive numbers");

byte b1=bObj.byteValue();

short s1=sObj.shortValue();

int i1=iObj.intValue();

long l1=lObj.longValue();

float f1=fObj.floatValue();

double d1=dObj.doubleValue();

System.out.println(b1);

System.out.println(s1);

System.out.println(i1);

System.out.println(l1);

System.out.println(f1);

System.out.println(d1);

}

}

Output:

Converting primitive numbers to objects using constructor

105

2015

32717

234543335565675

3.1415

3.1415

Converting object numbers to primitive numbers

105

2015

32717

234543335565675

3.1415

3.1415

4. Converting Primitive Numbers to Strings using toString() static method of the corresponding Wrapper Class

Example:

class ConvertPrimitiveToString

{

public static void main(String args[])

{

System.out.println("Converting primitive numbers to String "+

"using toString() static method of corresponding wrapper class:");

byte b=105;

String str=Byte.toString(b);

System.out.println(str);

short s=303;

str=Short.toString(s);

System.out.println(str);

int i=100;

str=Integer.toString(i);

System.out.println(str);

long l=4544444444444l;

str=Long.toString(l);

System.out.println(str);

float f=3.444f;

str=Float.toString(f);

System.out.println(str);

double d=3.44444;

str=Double.toString(d);

System.out.println(str);

}

}

Output:

Converting primitive numbers to String using toString() static method of corresponding wrapper

class:

105

303

100

4544444444444

3.444

3.44444

5. Converting Numeric Objects to Strings using toString() method of the corresponding Wrapper Class

Example:

class ObjectToStringDemo

{

public static void main(String args[])

{

System.out.println("Converting object numbers to Strings using "+

"toString() method of corresponding wrapper class:");

byte b=103;

Byte bObj=new Byte(b);

String str=bObj.toString();

System.out.println(str);

short s=203;

Short sObj=new Short(s);

str=sObj.toString();

System.out.println(str);

Integer iObj=new Integer(32000);

str=iObj.toString();

System.out.println(str);

str=new Long(4544444444444l).toString();

System.out.println(str);

str=new Float(3.1444f).toString();

System.out.println(str);

str=new Double(4.1444).toString();

System.out.println(str);

}

}

Output:

Converting object numbers to Strings using toString() method of the corresponding wrapper class:

103

203

32000

4544444444444

3.1444

4.1444

6. Converting String Objects (Numeric Strings) to Numeric Objects using the static valueOf() method of the corresponding Wrapper Class

Example:

class StringToNumericObjectDemo

{ public static void main(String args[])

{ String str="30";

//String str=new String("30");

String str2="30.333";

Byte bObj=Byte.valueOf(str);

//Byte bObj1=new Byte(str2); //NumberFormatException

Short sObj=Short.valueOf(str);

Integer iObj=Integer.valueOf(str);

Long lObj=Long.valueOf("344324232432");

Float fObj=Float.valueOf("3.333");

Double dObj=Double.valueOf(str2);

System.out.println(bObj);

System.out.println(sObj);

System.out.println(iObj);

System.out.println(lObj);

System.out.println(fObj);

System.out.println(dObj);

}

}

Output:

30

30

30

344324232432

3.333

30.333

Note: All of the valueOf( ) methods throw “NumberFormatException” if the string does not contain a parsable number.

7. Converting String Objects (Numeric Strings) to Numeric Objects using Constructor of the corresponding Wrapper Class

Example:

class StringToNumericObjectDemo1

{ public static void main(String args[])

{ String str=new String("30");

//String str="30";

String str2=new String("30.333");

Byte bObj=new Byte(str);

//Byte bObj1=new Byte(str2); //NumberFormatException

Short sObj=new Short(str);

Integer iObj=new Integer(str);

Long lObj=new Long(str);

Float fObj=new Float(str2);

Double dObj=new Double(str2);

System.out.println(bObj);

System.out.println(sObj);

System.out.println(iObj);

System.out.println(lObj);

System.out.println(fObj);

System.out.println(dObj);

}

}

Output:

30

30

30

30

30.333

30.333

Note: The Above constructors throw “NumberFormatException” if the string does not contain a parsable number.

8. Converting String Objects (Numeric Strings) to Primitive Numbers using parsing method of the corresponding Wrapper Class

Example:

class StringToPrimitiveDemo

{ public static void main(String args[])

{ String str=new String("30");

//String str="30";

String str2=new String("30.333");

byte b=Byte.parseByte(str);

//byte b1=Byte.parseByte(str2); //NumberFormatException

short s=Short.parseShort(str);

int i=Integer.parseInt(str);

long l=Long.parseLong(str);

float f=Float.parseFloat(str2);

double d=Double.parseDouble(str2);

System.out.println(b);

System.out.println(s);

System.out.println(i);

System.out.println(l);

System.out.println(f);

System.out.println(d);

}

}

Output:

30

30

30

30

30.333

30.333

Note: parseXXX( ) methods throw “NumberFormatException” if the string does not contain a parsable number.

9. Constants defined in classes Double and Float

MAX_VALUE

MIN_VALUE

NaN

NEGATIVE_INFINITY

POSITIVE_INFINITY

TYPE    (The Class instance representing the primitive type double/float)

SIZE     (The number of bits used to represent a double value). Since J2SDK 1.5.

10. Other Methods in Float Class


11. Constants defined in classes Byte, Short, Integer and Long

Methods in the Double class are almost the same as methods of the Float Class; with the use of double and Double words instead of float and Float words in the previous table.

12. Constants defined in classes Byte, Short, Integer and Long

MIN_VALUE

MAX_VALUE

TYPE   (The Class instance representing the primitive type byte/short/int/long)

SIZE The number of bits used to represent a byte/short/int/long value in two's complement binary form. Since J2SDK 1.5.

13. Other Methods in Byte Class


 14. Other Methods in Short Class

Methods in the Short class are the same as methods of the Byte class, with the use of short and Short words instead of byte and Byte words in the above table.

15. Other Methods in Integer Class


16. Other Methods in Integer Class

Methods in the Long class are almost the same as methods of the Integer Class.

17. Character Class

The Character class wraps a value of the primitive type char in an object.

Constructor

Character(char value)

Constructs a newly allocated Character object that represents the specified char value.

Example: Character chObj = new Character(‘A’);

Methods

Some of the methods of Character class are described in the following table:


 Example:

class CharacterDemo1

{ public static void main(String args[])

{ char ch[]={'a', 'b','5','?','A',' '};

for(int i=0; i<ch.length;i++)

{ if(Character.isLowerCase(ch[i]))

if(Character.isDigit(ch[i]))

if(Character.isLetter(ch[i]))

if(Character.isUpperCase(ch[i]))

if(Character.isWhitespace(ch[i]))

System.out.println(ch[i]+" is lowercase");

System.out.println(ch[i]+" is a digit");

System.out.println(ch[i]+" is a letter");

System.out.println(ch[i]+" is in uppercase");

System.out.println(ch[i]+" is a whitespace");

}

System.out.println(Character.isLetter(65)); //for 'A'

System.out.println(Character.isLetter(64)); //for '@'

}

}

Output:

a is lowercase

a is a letter

b is lowercase

b is a letter

5 is a digit

A is a letter

A is in uppercase

  is a whitespace

true

false

18. Boolean Class

The Boolean class wraps a value of the primitive type boolean in an object.

18.1 Constructors


18.2 Methods of Boolean Class


Example: The Stack class in the following example represents a generalized stack as it is using an array of objects to store the elements. The StackDemo class creates three instances and uses them to store primitive data types using wrapper classes.

class Stack

{

int top = -1;

int size;

Object a[];

Stack(int size)

{

this.size = size;

a = new Object[size];

}

void push(Object x)

{

if(top == size-1)

{

System.out.println("Stack Full");

return;

}

top = top + 1;

a[top] = x;

}

Object pop()

{

if(top ==  -1)

{

return null;

}

Object x = a[top];

top = top - 1;

return x;

}

}

class StackDemo

{

public static void main(String args[])

{

Stack s1 = new Stack(10);

Stack s2 = new Stack(10);

Stack s3 = new Stack(10);

s3.push(new Integer(10));

s3.push(new Long(20L));

s3.push(new Float(13.5));

s3.push(new Double(14.5));

for(int i = 0; i < 10; i++)

{ s1.push(new Integer(i));

}

for(int i = 10; i < 20; i++)

{ s2.push(new Float(i+0.5));

}

Object x; int sum = 0;

for(int i = 0; i < 10; i++)

{ x = s1.pop(); System.out.print(x + " ");

int a = ((Integer)x).intValue();

sum = sum+a;

}

float fsum = 0;

System.out.println("\n sum: "+sum);

for(int i = 0; i < 10; i++)

{

x = s2.pop();

System.out.print(x +" ");

float f = ((Float)x).floatValue();

fsum = fsum+f;

}

System.out.println("\n sum: " + fsum);

double dsum = 0;

while((x = s3.pop()) != null)

{ System.out.print(x +" ");

if(x instanceof Integer)

if(x instanceof Long)

if(x instanceof Float)

if(x instanceof Double)

}

System.out.println("\n sum: " + dsum);

dsum= dsum + ((Integer)x).intValue();

dsum= dsum + ((Long)x).longValue();

dsum= dsum + ((Float)x).floatValue();

dsum= dsum + ((Double)x).doubleValue();

}

}

Output:

9 8 7 6 5 4 3 2 1 0

 sum: 45

19.5 18.5 17.5 16.5 15.5 14.5 13.5 12.5 11.5 10.5

 sum: 150.0

14.5 13.5 20 10

 sum: 58.0

java.lang.Object Class

1.Introduction

The Object class is at the root of all the hierarchies in Java. This class is part of the java.lang package. All classes extend the Object class, either directly or indirectly. Even if you write a simple class (i.e. it is not extending any base-class), it implicitly extends built-in Object class.

Thus the features of this class will be available in all the classes because of inheritance.

2. Important Methods in Object class

The object class defines following methods, which are inherited by all the classes.
  • public int hashCode()
  • public boolean  equals(Object obj)
  • public final Class getClass()
  • public String toString()
  • public protected void finalize() throws Throwable
  • public protected Object clone() throws CloneNotSupportedException
  • public final void wait(long timeout) throws InterruptedException
  • public final void wait(long timeout, int nanos) throws InterruptedException
  • public final void wait() throws InterruptedException
  • public final void notify()
  • public final void notifyAll()

2.1 public int hashCode()

When storing objects in hash tables, this method can be used to get a hash value for an object.

This value is guaranteed to be consistent during the execution of the program. If the objects of a class are to be maintained in hash based collections and maps of the java.util package, the class must provide appropriate implementation of the following methods from class Object:
  • hashCode()
  • equals()

As a general rules for implementing these methods a class that overrides the equals() method must also override the hashCode() method.

General contract of the hashCode() method:

(a) Consistency during execution: Multiple invocations of the hashCode() method on an object must consistently return the same hash code during the execution of an application, provided the object is not modified to affect the results returned by the equals() method.

(b) Object value equality implies hash value equality.

(c) Object value inequality places no restrictions on the hash value. If two objects are unequal according to equals() method, then the hashCode() method need not produce distinct hash code for these objects. It is strongly recommended that the hashCode() method produce unequal hash codes for unequal objects.

Note: The hash contract does not imply that objects with equal hash codes are equal. Not producing unequal hash codes for unequal objects can have an adverse effect on performance, as unequal objects will hash to same bucket, which will result in collision.

2.2 boolean equals(Object obj)

If every object is to be considered unique, then it is not necessary to override the equals() method of the Object class. This method implements object reference equality. It implements the most discriminating equivalence relation possible on objects. Each instance of the class is equal to itself.

The equals() method is usually overridden to provide the semantics of object value equality, as is the case for the wrapper classes and the String class.

2.3 final Class getClass()

Returns the runtime class of the object, which is represented by an object of the class java.lang.Class at runtime.

Example: The following example illustrates that this method can be used to get the Class object corresponding to any java Object. We can then use method of the class Class to get information about the object's class using reflection/introspection.

import java.lang.reflect.Method;

import java.lang.reflect.Field;

class DispClassInfo

{

public static void main(String args[]) throws ClassNotFoundException

{

String s = new String ("Hello");

Class c = s.getClass();

Method m[] = c.getMethods();

int l;

l = m.length;

System.out.println (".........Public Methods (" + l + ")......");

for(int i = 0; i < l; i++)

{

System.out.println (m[i]);

}

Field f[] = c.getFields();

l = f.length;

System.out.println (".........Public Fields (" + l + ")......");

for(int i = 0; i < l; i++)

{

System.out.println (f[i]);

}

m = c.getDeclaredMethods();

l = m.length;

System.out.println ("......... Declared Methods (" + l + ")......");

for(int i = 0; i < l; i++)

{

System.out.println (m[i]);

}

f = c.getDeclaredFields();

l = f.length;

System.out.println (".........Declared Fields (" + l + ")......");

for(int i = 0; i < l; i++)

{

System.out.println (f[i]);

}

}

}

Example: The previous example is modified so as to read the fully qualified class name as command line argument and then display the information about the class's methods and fields using reflection/introspection.

import java.lang.reflect.Method;

import java.lang.reflect.Field;

class DispClassInfo

{

public static void main(String args[]) throws ClassNotFoundException

{

Class c = Class.forName(args[0]);

Method m[] = c.getMethods();

int l;

l = m.length;

System.out.print();

System.out.println (".........Public Methods (" + l + ")......");

for(int i = 0; i < l; i++)

{

System.out.println (m[i]);

}

Field f[] = c.getFields();

l = f.length;

System.out.println (".........Public Fields (" + l + ")......");

for(int i = 0; i < l; i++)

{

System.out.println (f[i]);

}

m = c.getDeclaredMethods();

l = m.length;

System.out.println ("......... Declared Methods (" + l + ")......");

for(int i = 0; i < l; i++)

{

System.out.println (m[i]);

}

f = c.getDeclaredFields();

l = f.length;

System.out.println (".........Declared Fields (" + l + ")......");

for(int i = 0; i < l; i++)

{

System.out.println (f[i]);

}

}

}

2.4 String toString()

If a sub class does not override this method, it returns a textual representation of the object, which has the following format:

“<name of the class>@<hash code value of object>”

The method is usually overridden and used for debugging purposes. The method call System.out.println(Objref) will implicitly convert its argument to a textual representation using toString() method.

Example: This example demonstrates what gets displayed if we try to display object of class Box1. The object is converted to the textual representation using the toString() method of the object class.

class Box1

{ double w, h, d;

Box1(double w, double h, double d)

{ this.w=w; this.h=h; this.d=d;

}

}

class ToStringDemo1

{ public static void main(String args[])

{ Box1 b=new Box1(10,12,14);

String s="Box1 b: "+b; //concatenates box object

System.out.println(b);

System.out.println(s);

}

}

Output:

Box1@82ba41

Box1 b: Box1@82ba41

Example: This example demonstrates that if we override the toString() method in the Box1 class then the overridden method is used to convert the object to its textual representation.

class Box1

{ double w, h, d;

Box1(double w, double h, double d)

{ this.w=w; this.h=h; this.d=d;

}

public String toString()

{ return "Dimensions are "+w+" by "+h+" by "+d+".";

}

}

class ToStringDemo2

{ public static void main(String args[])

{ Box1 b=new Box1(10,12,14);

String s="Box1 b: "+b; //concatenates box object

System.out.println(b);

System.out.println(s);

}

}

Output:

Dimensions are 10.0 by 12.0 by 14.0.

Box1 b: Dimensions are 10.0 by 12.0 by 14.0.

2.5 protected void finalize() throws Throwable

It is called on an object just before it is garbage collected, so that any cleaning up can be done.

However, the default finalize() method in the object class does not do anything useful. This may be useful for releasing non-java resources but not recommended.  It is possible that finalize() method may never be called if enough memory is available and in that case resources may never be released.

2.6 protected Object clone() throws CloneNotSupportedException

New objects that are exactly the same (i.e., have identical states) as the current object can be created by the clone() method, that is, primitive values and reference values are copied. This is called shallow cloning.

A class can override the clone() method to provide its own notion of cloning. For example, cloning a composite object by recursively cloning the constituent objects is called deep cloning.

When overridden, the method in the subclass is usually declared public to allow any client to clone objects of the class.

If overriding clone() method relies on the clone() method in the Object class, then the subclass must implement the Cloneable marker interface to indicate that its objects can be safely cloned. Otherwise, the clone() method in the Object class will throw a checked CloneNotSupportedException.

Using clone() and the Cloneable interface

The clone() method generates a duplicate copy of the object on which it is called.

These are few important faces related to clone() method.

  • Only classes that implement the Cloneable interface can be cloned.
  • The Cloneable interface defines no members. It is used to indicate that a class allows a bit-wise copy ofan object (that is, a clone) to be made. If you try to call clone() on object of a class that does not implement Cloneable interface, CloneNotSupportedException is thrown.
  • Cloneable interface is an empty interface. Such an interface is called marker/tag interface.
  • When a clone is made, the constructor for the object being cloned is not called.
  • A clone is simply an exactly copy of the original. Cloning is potentially a dangerous action, because it can cause unintended side effects. For example, if the object being cloned contains a reference variable called objRef, then when the clone is made the objRef in clone will refer to the same object as does objRef in original. If the clone makes a change to the contents of the object referred to by objRef, then it will be changed for the original object, too.

Example: The following example demonstrate the use of clone() method. The CloneDemo1 class is making clone of the object of class TestClone by indirectly calling the clone method through cloneTest() method because clone() method of the object class is protected.

class TestClone implements Cloneable

{

int a;

double b;

public TestClone cloneTest() throws CloneNotSupportedException

{

}

return (TestClone) clone();

}

class CloneDemo1

{

public static void main(String a[]) throws CloneNotSupportedException

{

TestClone tc1 = new TestClone();

TestClone tc2;

tc1.a = 10;

tc1.b = 3.5;

tc2 = tc1.cloneTest();

System.out.println (tc2.a);

System.out.println (tc2.b);

}

}

Output:

10

3.5

Here, the method cloneTest() calls clone() of Object class and returns the result. Notice that the object returned by clone() must be cast into its appropriate type i.e. TestClone.

Example: In the following example the clone() method is overridden so that it can be called from code outside of its class. To do this, its access modifier must be public.

class TestClone1 implements Cloneable

{

int a;

double b;

public Object clone() throws CloneNotSupportedException

{

}

}

class CloneDemo2

{

public static void main(String a[]) throws CloneNotSupportedException

{

return super.clone();

TestClone1 tc1 = new TestClone1();

TestClone1 tc2;

tc1.a = 10;

tc1.b = 3.5;

tc2 = (TestClone1) tc1.clone();

System.out.println (tc2.a);

System.out.println (tc2.b);

}

}

Output:


10

3.5

Example: In the following example the clone() method is overridden such that it does not make use of the clone() method of the Object class. We are writing our own clone() method.

class TestClone2

{

int a;

double b;

public Object clone()

{

TestClone2 tc = new TestClone2();

tc.a = a;

tc.b = b;

return tc;

}

}

class CloneDemo3

{

public static void main(String a[])

{

TestClone2 tc1 = new TestClone2();

TestClone2 tc2;

tc1.a = 10;

tc1.b = 3.5;

tc2 = (TestClone2) tc1.clone();

System.out.println (tc2.a);

System.out.println (tc2.b);

}

}

Note: You need not declared CloneNotSupportedException and need not implement Cloneable interface if implementing your own clone() method.

Side Effects of Cloning

The side effects caused by cloning are sometimes difficult to see at first. It is easy to think that a class is safe for cloning when it actually is not. In general, you should not implement Cloneable interface for any class without good reason.

Example: This example demonstrates the side effect of cloning.

class TestShallowClone implements Cloneable

{

int a;

double b;

int c[];

public Object clone() throws CloneNotSupportedException

{

}

}

class ShallowCloneDemo

{

public static void main(String a[]) throws CloneNotSupportedException

{

return super.clone();

TestShallowClone tc1 = new TestShallowClone();

TestShallowClone tc2;

tc1.a = 10;

tc1.b = 3.5;

int c[] = new int[4];

for(int i = 0; i < 4; i++)

c[i] = i;

tc1.c = c;

for(int i = 0; i < 4; i++)

System.out.println ("tc1.c["+i+"]="+tc1.c[i]);

tc2 = (TestShallowClone) tc1.clone();

System.out.println ("tc2.a="+tc2.a);

System.out.println ("tc2.b="+tc2.b);

for(int i = 0; i < 4; i++)

System.out.println ("tc2.c["+i+"]="+tc2.c[i]);

for(int i = 0; i < 4; i++)

tc2.c[i] = i+4;;

for(int i = 0; i < 4; i++)

System.out.println ("tc2.c["+i+"]="+tc2.c[i]);

for(int i = 0; i < 4; i++)

System.out.println ("tc1.c["+i+"]="+tc1.c[i]);

}

}

Output:

tc1.c[0]=0

tc1.c[1]=1

tc1.c[2]=2

tc1.c[3]=3

tc2.a=10

tc2.b=3.5

tc2.c[0]=0

tc2.c[1]=1

tc2.c[2]=2

tc2.c[3]=3

tc2.c[0]=4

tc2.c[1]=5

tc2.c[2]=6

tc2.c[3]=7

tc1.c[0]=4

tc1.c[1]=5

tc1.c[2]=6

tc1.c[3]=7

Example: The following code eliminates the problem faced in the previous example by implementing deep cloning.

class TestDeepClone implements Cloneable

{

int a;

double b;

int c[];

public Object clone() throws CloneNotSupportedException

{

TestDeepClone tc = (TestDeepClone) super.clone();

int c[] = new int[4];

for(int i = 0; i < 4; i++)

c[i] = tc.c[i];

return super.clone();

}

}

class DeepCloneDemo

{

public static void main(String a[]) throws CloneNotSupportedException

{

TestDeepClone tc1 = new TestDeepClone();

TestDeepClone tc2;

tc1.a = 10;

tc1.b = 3.5;

int c[] = new int[4];

for(int i = 0; i < 4; i++)

c[i] = i;

tc1.c = c;

for(int i = 0; i < 4; i++)

System.out.println ("tc1.c["+i+"]="+tc1.c[i]);

tc2 = (TestDeepClone) tc1.clone();

System.out.println ("tc2.a="+tc2.a);

System.out.println ("tc2.b="+tc2.b);

for(int i = 0; i < 4; i++)

System.out.println ("tc2.c["+i+"]="+tc2.c[i]);

for(int i = 0; i < 4; i++)

tc2.c[i] = i+4;;

for(int i = 0; i < 4; i++)

System.out.println ("tc2.c["+i+"]="+tc2.c[i]);

for(int i = 0; i < 4; i++)

System.out.println ("tc1.c["+i+"]="+tc1.c[i]);

}

}

Output:

tc1.c[0]=0

tc1.c[1]=1

tc1.c[2]=2

tc1.c[3]=3

tc2.a=10

tc2.b=3.5

tc2.c[0]=0

tc2.c[1]=1

tc2.c[2]=2

tc2.c[3]=3

tc2.c[0]=4

tc2.c[1]=5

tc2.c[2]=6

tc2.c[3]=7

tc1.c[0]=0

tc1.c[1]=1

tc1.c[2]=2

tc1.c[3]=3

2.7 Methods useful in multi-threaded environment

In addition to methods discussed above, Object class provides support for thread communication in synchronized code through the following methods:

final void wait()

Causes current thread to wait until another thread invokes the notify() method or the notifyAll() method for this object.

final void wait(long timeout) throws InterruptedException

Causes current thread to wait until either another thread invokes the notify() method or the notifyAll() method for this object, or some other thread interrupts the current thread, or the specified amount of time has elapsed.

final void wait(long timeout, int nanos) throws InterruptedException


Causes current thread to wait until either another thread invokes the notify() method or the notifyAll() method for this object, or some other thread interrupts the current thread, or the certain amount of time has elapsed.

final void notify()


Wakes up a single thread that is waiting on this object's monitor.

final void notifyAll()

Wakes up all threads that are waiting on this object's monitor. A thread waits on an object's monitor by calling one of the wait methods.

A thread invokes these methods on the object whose lock it holds. A thread waits for notification by another thread.

Friday, 19 June 2015

Java StringBuffer Class

StringBuffer is a peer class of String that provides much of the functionality of Strings. In contrast to String, StringBuffer represents growable and writeable character sequences.

StringBuffer may have characters and substrings inserted in the middle or appended to the end.

StringBuffer will automatically grow to make room for such additions and often has more characters pre-allocated than are actually needed, to allow room for growth.

Few important point related to StringBuffer class

  • StringBuffer is an Object like String.
  • StringBuffer class is also final like String class.
  • StringBuffer objects are mutable (can be modified) unlike String objects.

Constructors of StringBuffer Class


Methods of StringBuffer Class


Example:

class SBDemo1

{ public static void main(String args[])

{ StringBuffer sb1 = new StringBuffer();

System.out.println("sb1: length: "+sb1.length() + " capacity: " + sb1.capacity());

StringBuffer sb2 = new StringBuffer(100);

System.out.println("sb2: length: "+sb2.length() + " capacity: " + sb2.capacity());

StringBuffer sb3 = new StringBuffer("Hello");

System.out.println("sb3: length: "+sb3.length() + " capacity: " + sb3.capacity());

sb1.ensureCapacity(200);

System.out.println("sb1: length: "+sb1.length() + " capacity: " + sb1.capacity());

sb3.setLength(10);

System.out.println("sb3: length: "+sb3.length() + " capacity: " + sb3.capacity());

System.out.println("sb3: "+sb3);

sb3.setLength(3);

System.out.println("sb3: length: "+sb3.length() + " capacity: " + sb3.capacity());

System.out.println("sb3: "+sb3);

}

}

Output:

sb1: length: 0 capacity: 16

sb2: length: 0 capacity: 100

sb3: length: 5 capacity: 21

sb1: length: 0 capacity: 200

sb3: length: 10 capacity: 21

sb3: Hello

sb3: length: 3 capacity: 21

sb3: Hel

append() Method

It has overloaded versions for all the built-in types and for Object. These are the few of its form:

public StringBuffer append(char c)

public StringBuffer append(String str)

public StringBuffer append(boolean b)

public StringBuffer append(Object obj)

public StringBuffer append(int num)

public StringBuffer append(double

public StringBuffer append(char[] str)

public StringBuffer append(StringBuffer sb)

String.valueOf() method is called for each parameter to obtain its String representation. The result is appended to the current StringBuffer object. The buffer itself is returned by each version of append(). This allows subsequent calls to be chained together.

Note: If null string is appended then “null” gets appended.

insert() Method

The insert() method inserts one string into another. It is overloaded to accept values of all the simple types, plus Strings and Objects. Like append() method, it calls String.valueOf() method to obtain the string representation of the argument passed to it. This string is then inserted into the invoking StringBuffer object. These are the few of its form:

public StringBuffer insert(int offset, char c)

public StringBuffer insert(int offset, int c)

public StringBuffer insert(int offset, long l)

public StringBuffer insert(int offset, char[] str)

public StringBuffer insert(int offset, double d)

public StringBuffer insert(int offset, float f)

public StringBuffer insert(int offset, String str)

public StringBuffer insert(int offset, Object obj)

Example: The following example illustrates some of the methods discussed above.

class SBDemo2

{ public static void main(String args[])

{ String s; int a=42;

StringBuffer sb=new StringBuffer(40);

s=sb.append("a= ").append(a).append("!").toString();

System.out.println(s);

StringBuffer sb1=new StringBuffer("I Java!");

sb1.insert(2, "like ");

System.out.println(sb1);

System.out.println("Reverse of "+sb1+" is: "+sb1.reverse());

}

}

Output:

a= 42!

I like Java!

Reverse of I like Java! is: !avaJ ekil I